Growling Frog Course Review
April 26, 2024
| Home > Golf Resources > Growling Frog Course Review > | ||
|
Home
About Us
Golf Events
The Campfire
Golf Resources
13th Beach Golf Links Course Review
The Dunes Golf Links Course Review
Waterford Valley Course Review
Growling Frog Course Review
Heathcote Golf Club Course Review
Amstel Ranfurlie Course Review
Weather
Golf Handicap
Membership
Golfers
Contact
Poll
|
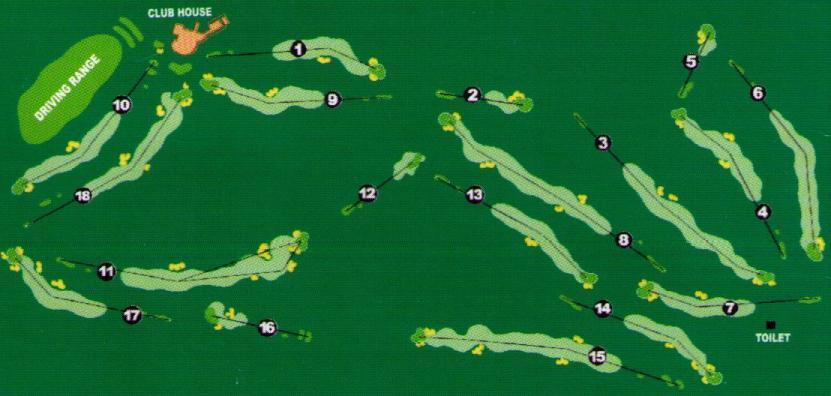
On Sunday March 12, 2006, three intrepid Bushrangers ventured north to Yan Yean and into a valley below the southern tip of the Great Dividing Range within sight of Fraser’s Hill which towers over Ned Kelly’s first home in Beveridge. This is where the Growling Frog Golf Course lies serenely in wait for the unsuspecting Aussie golfer. Armed only with a bag of sticks and the courage to take driver when an iron would suffice, our heroes embarked on their adventure to ‘case’ the Frog. This is what they found.
Hole 1 Par 4 330 metres Rated 11 A fascinating start to the journey. A shortish par 4 that plays downhill all the way and slightly left to right. The green is out of sight from the tee-box as the fairway moves right and more steeply downhill about 80 meters before the putting surface. With a tail-wind, the green is reachable for the big hitters; however, the chances of getting a drive to stay on the dance-floor are remote. The elevated green is tight and angles from front-right to back-left. The design encourages a short approach from beside the right fairway bunker. On the tee, the choice is clear: either commence your round with some sound course management by taking your 200-metre club to set up the easy approach, or pull out the heavy artillery and go for the miracle drive. The only risk is an early and costly trip to the magoombah which may throw your whole round off the rails; the rewards are a lifetime of bragging. Bushranger rating: A great golf hole. Enjoy the ride. Hole 2 Par 3 161 metres Rated 16 Gauging the distance is the key here as the undulating terrain makes estimating the journey a real challenge. The only serious penalties from the tee are the greenside bunkers on the left and the small matter of a billabong lurking about 25 metres right of the putting surface to gobble a wild push or slice. If the prevailing northerly is blowing, getting to the green isn’t the problem; it’s stopping the pill when it gets there. If you miss, try and get your chip below the hole as there are enough slopes on this deck to make downhill putts a nasty business once gravity gets involved. Bushranger rating: A good second hole and a nice entrée to whet the appetite for what’s to come. Hole 3 Par 5 482 metres Rated 14 And now you’ve arrived. A challenging drive between glorious River Red Gums to an uphill sloping fairway running straight away beyond the crest of a small slope. Water and bunkers are positioned to the left of the landing zone and a vast, sprawling tundra lurks off to the right between this and the eighth hole. Hit it straight or be stuffed. The second shot is blind over the crest to the right of a magnificent gum tree, leaving an approach to a green tucked slightly left and protected by bunkers on the right side. The green slopes off the bunkers so if you miss it, err on the left side. Bushranger rating: A solid opening to the big holes. You’ve played some good golf to score par or better on this one. Hole 4 Par 4 349 metres Rated 8 Near the tee, there is a glorious strand of knobbly River Red gums to accompany your preparation for this most challenging hole. An accurate drive is required to set up an approach which demands considerable precision. When you line up your drive, you will see there is sand and water in the distance to the left, an elevated fairway obscuring the path to the green and a majestic gum on the right fairway edge guarding a bunker with another wretched wasteland further to the right waiting for anything sliced. For the second shot, the hole moves slightly to the left and a solid approach is required to get your ball in a good position on a clover-shaped green that features a front-left bunker and a ridge down the middle at the rear of the putting surface. Bushranger rating: Bloody tough hole, especially if the wheels come off in the tee box. Hole 5 Par 3 135 metres Rated 18 A beautiful little hole. A reedy lake rests beside the tee and runs up the left side. The water doesn’t reach the green so it’s not truly in play, however the large bunker across the centre-left portion of the elevated green certainly is. You’d better hit the right club the right distance or there will be all sorts of problems waiting. The safe play for the intermediate golfer is shooting for the front-right portion of the green; an imperfect shot will leave a relatively safe chip onto an undulating surface and the chance of jagging what may be a much needed par. As the shortest hole on the course, it is a gimme to be used for nearest-the-pin in most competitions. If so, look out for the sucker pin on the left side; this is sure to get a few duffers confused about whether or no to go for it. Bushranger rating: Like many here, it asks questions that demand well thought answers. Good golf hole Hole 6 Par 4 421 metres Rated 1 Things get a little tougher here at the hardest hole. And guess what: it’s long. And hard. It doglegs right after a couple of hundred. Then there’s more length all the way to a massive green with subtle tiers and a large bunker front left. And did we mention it is very long and rather hard? At the risk of stating the bleeding obvious, par is a good score here. Bushranger rating: bloody long and hard. Hole 7 Par 4 331 metres Rated 10 The only relief you’ll get here is the toilet positioned in the moonscape off to the front-left of the tee. A subtle dogleg to the right, the corner is guarded by several large Red Gums, some discrete bunkering and a couple of judiciously placed billabongs. So don’t miss right. The left isn’t much use either. Indeed, even an approach from the short stuff is demanding. The exposed and undulating green is protected by large bunkers front-left and back-right. Just hit a straight drive, a perfect approach and two superb putts and you might just jag a par. Bushranger rating: A tough journey for the hacker and if the wagon is getting a wobble, start hanging on real tight from here. Hole 8 Par 5 506 metres Rated 4 Strategically placed bunkers threaten the landing area for the drive on this three-shot par 5. Water on the left is out of play except for the wildest hook; however, the challenges keep coming on this well structured hole. The second shot must navigate a large fairway bunker on the left and the fairway a little further up is threatened by a pair of gargantuan Red Gums on the right. If you have found a safe place from where to hit your approach, all that remains is the simple task of clearing the two front bunkers guarding the very large kidney-shaped green which has slopes falling away severely on the left and at the back. Elementary. Bushranger rating: A hole peppered with wonderful challenges and options. Be prepared to change your strategy as you go.
Hole 9 Par 4 346 metres Rated 6
This hole is a brute. At nearly 350 metres, it plays uphill with a right-to-left slope on much of the first half of the trip before it turns slightly to the right and more directly up the slope, often playing straight into the prevailing wind. Terrific. The fairway bunker on the right jealously guards the dogleg while any drive falling left past the huge gum tree will feed down the slope and further away from the hole to add even more difficulty to the approach. Then it’s a long approach uphill to a treacherous green guarded by front-left and back-right bunkers. Don’t be surprised to hear playing partners requesting a pit-stop at the bar on the way to the 10th tee after this evil hole. Bushranger rating: It may not kill you but it certainly won’t make you stronger either. This hole demands respect.
Hole 10 Par 4 360 metres Rated 5 What a joy this tee is to stand on. Don’t rush this drive. Savour the moment as you stand in front of the clubhouse looking down on the fairway and across a beautiful expanse of valley to the south-west through which the Frog snakes, winds and growls. A slight dogleg left with one bunker on the corner, this hole is laid out before you from the tee. It is one of the best views on the course and the most inviting place to take out your favourite 400+ cubic inch whopping stick and lash one into the great beyond. Bushranger rating: There is a bit more to this hole than just the drive but we prefer not to labour the memory with frivolous details. Hole 11 Par 5 488 metres Rated 12 Another well organised par 5 which supplies an interesting range of options. The bunkering dictates a clear three-shot strategy but leaves the option open to consider going for the green in two if you are a big hitter and get a great drive away. Try and place your drive to the right of the fairway bunker which is very much in play. From there, the two options are to lay up to the right of the next large fairway bunker on the left side or, if you’ve driven it way long, consider taking on this bunker and trying to thread the needle of the greenside bunkers to set up an eagle putt. It should be noted the rewards for this more aggressive strategy do come with a measure of risk. Bushranger rating: Ignore all the above if you find the beach or the magoom at any stage. Hole 12 Par 3 164 metres Rated 15 A medium length par 3 which, in the context of the course, represents another piece of thoughtful design. There are no greenside bunkers, so a straight miss-hit can still clamber onto the putting surface which should suit many of the less able among us. The real challenge of this hole is the extreme undulations on the putting surface. Players are well advised to treat this deck with respect. Before you hit your second shot, carefully consider trying to keep it below the hole. Par is a good score. Bushranger rating: The putting is so tricky, the best strategy is to just ace it and leave the flat stick in the bag. Hole 13 Par 4 350 metres Rated 13 As long as you aced 12, you’ll be feeling pretty good stepping up to the teeing ground on 13. Try and keep those positive vibes flowing by casually lobbing one down the middle. This will prove advantageous as there is no water in the centre of the fairway. Don’t go left. Or right. Then stick a mid-iron below the hole on the kidney-shaped-back-to-front-and-left-to-right-sloping-front-right-to-back-left-offset-and-undulating green, avoiding the bunker behind and the magoombah penalty lurking left and front. Bushranger rating: Really just a snack to get the final third of the round underway. Hole 14 Par 4 331 metres Rated 9 Another gentle dogleg here with the bunker strategically placed on the corner to force some thought on tee-shot placement. For the approach shot, the fairway turns uphill which makes judging the distance quite a challenge. On a windy day, this will be magnified as the shot will be played from a sheltered position and more brutally affected once the pill climbs above the crest of the hill. Once you make it to the green, you’ll find there is plenty of gravity in play so, once again, try and keep yourself below the hole. Bushranger rating: For the second shortest hole, it’s a doozey. Hole 15 Par 5 511 metres Rated 3 On the 15th tee, we are virtually at the furthest point on the course from the clubhouse, and here we make the turn for home. It’s time to strap yourself in and get involved in a sequence of closing holes which we rate as world-class. This is the longest hole at the Frog and, since it often can play into the prevailing wind, there is a great temptation to ignore your ball and head off for a chat with the ponies grazing in the paddock out-of-bounds to the left. Resist this. There’s still work to do: despite the bunkers left and right on the drive, it is a large, inviting fairway that slopes down gently from the tee. For the second shot, a bunker left and billabong to the right will keep you busy as you set up for your third to the elevated green with bunkers at the front, requiring a precise approach, preferably coming down from a great height to give it some stopping power. Bushranger rating: It would be a profound understatement to refer to this hole is a good test of golf. Bushranger Note: As you stand on the 15th tee, note the aforementioned O.O.B. paddock to the left. It is probably a good indication of how most of the terrain on which Growling Frog is built would have appeared to Graham Marsh and his team when they first surveyed this area. It is beautiful countryside and a testament to the designer’s skill and imagination in transforming this landscape into the golf course it has become whilst remaining true to the unique character of this inspiring environment. Hole 16 Par 3 188 metres Rated 7 Congratulations on surviving 15. Welcome to 16, the longest par 3 on the course. It plays gently downhill all the way with large bunkers left and right of the green and the undulating ground around the dance-floor makes it difficult to assess the subtleties of the terrain. The best bet is to hit a long, straight shot and one or two excellent putts on the large green. Bushranger rating: A beautiful hole made memorable by the ancient stone wall running down the O.O.B. border on the left side. Hole 17 Par 4 332 metres Rated 17 This is a great hole. After two ‘big’ holes, we get the last of the short par 4s and since it flows downhill, power and distance are not the challenge here. Guile, placement, subtlety and good sense are required to manage this hole and a well executed strategy will yield rewards. A dogleg right with a bunker and attendant red gums on the corner make drive placement the priority to set up an approach to a large green with three bodacious bunkers guarding it. Bushranger rating: A super 17th hole which is a great change-up after 15 and 16 and an ideal contrast to the 18th. Hole 18 Par 4 400 metres Rated 2 This is the second-longest par 4 at Growling Frog. It slopes gently uphill and gets steeper the closer we get to the green and the clubhouse which overlooks it. The challenges of the hole can be clearly seen from the tee: a large bunker sits guarding the dogleg for the very long hitters who are game (or foolish) enough to take it on. Play to the right of this. Then knock up a solid power-fade with a long iron to the green which is angled front-left to back-right with bunkers front and back to keep us honest. If you can’t reach the green in two, just lay up short-left, chip on, drain the putt and head straight for the bar. Bushranger rating: If you weren’t thirsty after the first 17, this one should’ve put the final nail in the coffin. Hole 19 Par Infinity 35000 cubic metres Rated Essential Mmmmmmm, the19th. Floor to ceiling windows in a huge semi-circle provide stunning views of the course from the hilltop location, in particular the 10th and 18th holes. It is the highest point on the course and the beverages are as chilled, tasty and frosty as any you will find anywhere in Yan Yean.
|
|